






















Guide spacing is one of those parts of rod building that looks simple until you actually start building rods. Find a spacing chart, measure out the distances, wrap the guides, finish the rod, and you're done, right? Not necessarily. While guide spacing charts are an excellent starting point, they don't know the specific blank you're building, the reel you're using, the line you'll fish, or how that particular rod will actually bend under load.
That brings us to the age-old question for rod builders: Should you follow a guide spacing chart, or should you static test the rod? My answer is that you really shouldn't have to choose. A good spacing chart can get you close, while static testing can help you fine-tune the guide train to the individual rod. When you combine the two, you have a much better chance of building a guide system that performs the way you intended.
Guide Spacing Charts: A Great Place to Start
Guide spacing charts exist for a reason. They give builders a proven starting point based on the length, power, action, and intended application of a blank. Instead of starting with a completely bare rod and trying to figure out where every guide belongs, a spacing chart gives you measurements that have already been developed around similar blanks and applications.
For a new builder, this can be extremely valuable. It takes some of the guesswork out of the process and gives you a layout that should produce a functional rod when properly installed.

Spacing charts can also save time for experienced builders. If you've built several rods using similar blanks, you probably already know that certain guide trains tend to work well for specific applications. A chart gets you in the neighborhood quickly, and then you can make adjustments from there.
The problem is that a chart is a recommendation, not a guarantee.
Even two blanks from different manufactures with the same length, power, and action can behave differently. One may have a softer tip. Another may transition into the midsection differently. One might be designed around a different material or construction process. Add a different reel, line size, guide style, or fishing technique, and the ideal guide placement can change again.
That's where static testing becomes important.
What Is Static Testing?
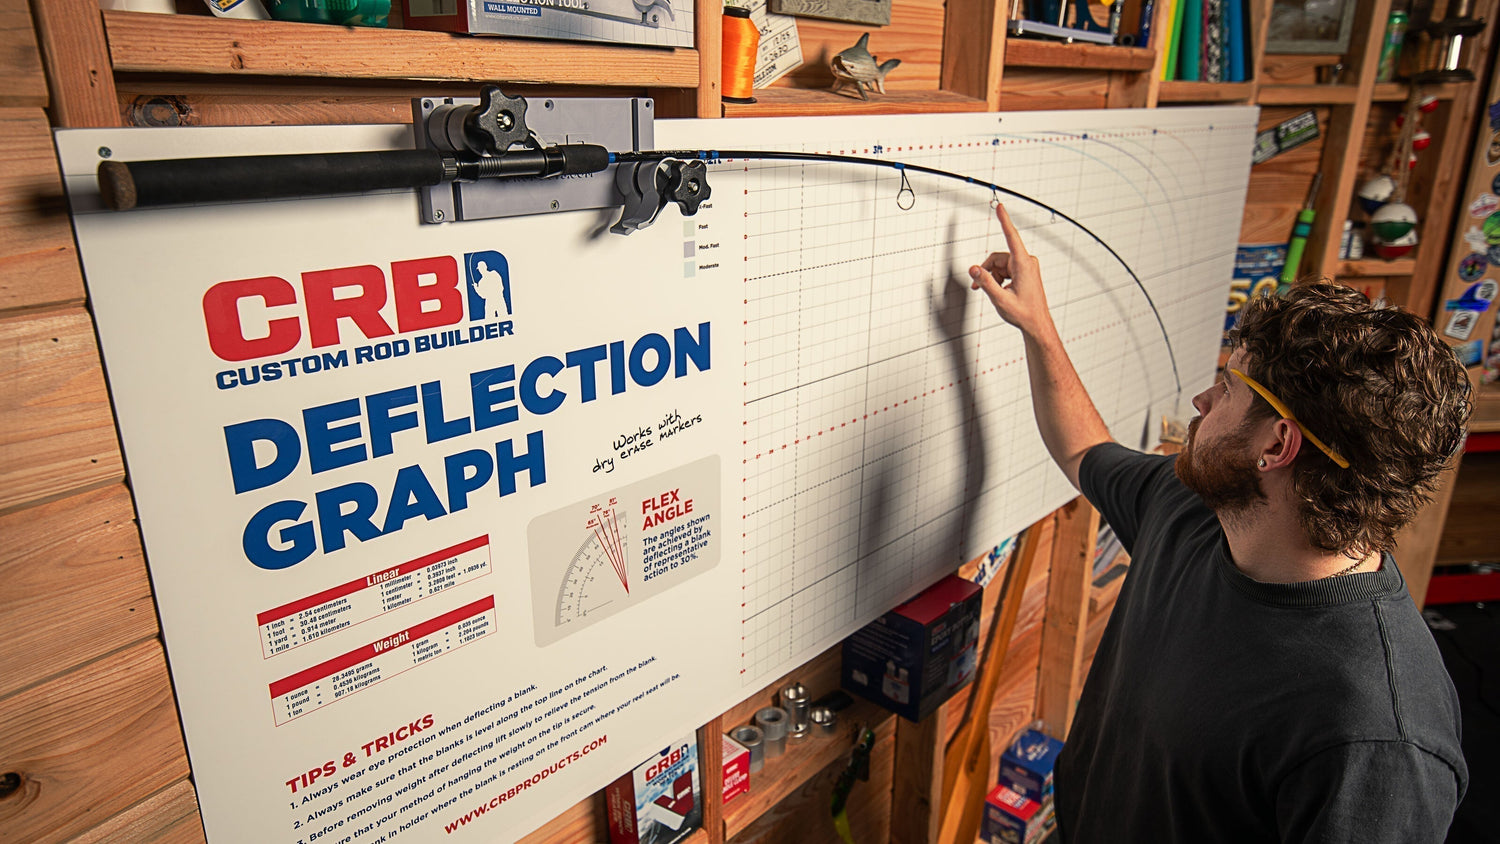
Static testing is essentially putting the rod under load and watching what happens.
The guides are temporarily positioned on the blank, usually with tape or another temporary method, and the line is run through the guides. The rod is then bent under a controlled load while you observe the relationship between the line, guides, and blank.
The goal isn't simply to see whether the rod bends. You want to see how the entire guide train works with the rod under load.
As the blank bends, the guides should help maintain a smooth, controlled line path that follows the natural curve of the blank. You are looking for areas where the line pulls too far away from the blank, where spacing leaves an excessive gap, or where the line path creates an unnecessarily sharp angle between guides.
This is especially important because the rod doesn't spend its entire life sitting straight on a rod rack. It bends when you cast, fight fish, set hooks, work lures, and deal with changing loads. A guide train that looks perfect on a straight, unloaded blank may look very different once that blank is working.
So Which Method Is Better?
If I had to choose only one, I'd choose static testing.
But that doesn't mean I would throw the spacing chart in the trash.
A spacing chart gives you a starting point. Static testing lets you evaluate that starting point on the actual blank you're building.
Think of it this way. A spacing chart tells you where to start looking. Static testing tells you whether those locations actually work.
That's an important distinction.
Starting completely from scratch with static testing can be unnecessarily time-consuming, especially when you're building a blank for which a proven spacing recommendation already exists. On the other hand, blindly following a chart without ever checking the guide train under load means you're assuming the chart is perfect for your specific build.
I prefer to use the chart to get the guides positioned, tape everything in place, and then static test the rod. If everything looks right, great. If the line path tells me that a guide needs to move, I make the adjustment before anything gets permanently wrapped.
That's a much better place to make a correction than after you've applied finish.

Static Testing Is About the Whole Rod
One of the biggest advantages of static testing is that you're evaluating the actual rod you're building, not just the blank on paper.
Think about everything that can influence a guide train. The reel you're pairing with the rod can affect the starting guide position and size. The line you're using can change how the line exits the spool and travels through the guide train. A heavier or lighter lure can change the way the rod loads during the cast. Even the intended technique can influence what you want from the guide system.
A finesse spinning rod designed around light braid and a small jighead is not doing the same job as a heavy inshore spinning rod throwing large plugs. A bass casting rod used for flipping and pitching isn't going to have the same demands as a rod designed to bomb crankbaits across a flat.
The blank itself is also a major factor. Power and action matter, but so does how the blank transitions through the bend. Two rods with identical published specifications can still behave differently when loaded. That's why static testing is so useful. You're not guessing how the blank behaves. You're watching it happen.
Don't Move Guides Just to Make the Curve Look Pretty
There is an important point here for newer builders. Static testing isn't about making every guide perfectly spaced so the blank forms a beautiful, symmetrical curve.
The goal is functional guide placement.
You want the line to follow the loaded blank naturally while maintaining appropriate clearance and avoiding unnecessary angles or line contact with the blank. The guide train should support the rod's action rather than restrict it. Sometimes that means the measurements between guides won't look perfectly uniform. That's okay.
Guide spacing isn't supposed to be a mathematical exercise where every gap is identical. The spacing should serve the way the blank bends.
This is one reason I don't like the idea of blindly measuring a guide chart and assuming you're finished... Well unless you are using one of Mud Hole's Signature Kits, as all the guess work is already done. We provide a rod recipe blue print with handle layout and guide spacing that is perfect. So, when you see people reference guide spacing charts, understand what kind of chart they are talking about.
Remember, the blank doesn't bend according to a ruler. It bends according to its construction, power, action, and the load placed on it.
Start at the Tip and Work Your Way Down
When static testing a rod, the tip section deserves particular attention. The smaller guides near the tip generally need closer spacing because the blank makes a tighter curve as it bends.As you work toward the butt, the spacing typically increases because the blank is bending less dramatically.
This is also where the transition from the smaller running guides toward larger guides becomes important on spinning rods. The guide train needs to control the line coming off the reel and gradually transition it into a controlled path down the blank.
The exact number, size, and spacing of those guides will depend on the rod and guide system you're using. That's another reason a spacing chart is useful. It gives you a sensible starting layout before you begin fine-tuning.
What About Casting Performance?
Here's where things get a little more complicated.
Static testing is excellent for evaluating how the guide train behaves when the rod is loaded, but it isn't a complete test of casting performance.

Casting introduces variables that static testing can't fully reproduce. The rod is moving dynamically, the line is coming off the reel at high speed, and the lure is creating its own load. With spinning rods especially, the way the line comes off the spool and is controlled by the first few guides can have a noticeable effect on casting performance.
So don't confuse static testing with a casting test.
If you're building a spinning rod, I like the idea of using the manufacturer's recommended guide train or spacing chart as your starting point, static testing it, and then, when practical, actually casting the rod before permanently finishing everything. If something isn't behaving the way you expect, you have the opportunity to make changes.
That is one of the biggest advantages of custom rod building. You aren't locked into the first arrangement you try.
A Better Approach: Use Both
For me, the best answer isn't charts versus static testing. It's charts plus static testing.
Start with the chart. It gives you a proven baseline and saves time. Temporarily install the guides and run your line through them. Then load the rod and see what the blank tells you.
If the line follows the blank naturally and the guide train looks right under load, you've got a solid starting point. If something doesn't look right, move the guide and test again.
Don't be afraid to make small adjustments. Sometimes moving a guide a fraction of an inch can change how the line tracks through that section of the rod. You don't need to completely reinvent the guide train. You're fine-tuning it.
And remember, temporary placement is cheap. Guide removal after finishing is not.
Take the time to tape your guides in place, test the rod, and make sure you're happy before you commit to the wraps and finish.
The Bottom Line
Guide spacing charts are valuable because they give rod builders a proven place to begin. Static testing is valuable because it lets you take that recommendation and apply it to the actual blank, components, and application you're building.
So, what's the better method?
Static testing wins when it comes to finalizing guide placement, but a spacing chart is still one of the best tools for getting you started.
The best builders aren't necessarily the ones who ignore charts. They're the ones who know when to use them, when to question them, and how to make adjustments based on what the rod is telling them.
At the end of the day, every blank is a little different, every build has its own purpose, and that's exactly why custom rod building is so rewarding. Use the chart to get close, static test to fine-tune, and let the blank tell you where the guides belong.